Inspiration:
Lighting can be creative tools to set up different time and moods in a shot, which gets me interested in doing an lighting direct study with Prof. Richard Davison in Spring 2013.Lighting Reference Studies
In my directed study, I pulled out many lighting reference from live-action as well as animation film to study how to combine different feature of lighting for story telling and creating mood. And most of my reference are on character lighting, which leads my study focus to Character Lighting.

This frame is from 'Blade Runner'. The whole character in this shot is close to a dark silhouette against the bright background, which create a very mysterious mood. Also, there is a bright rim light on the right side of the character. This helps draw audience's attention right to the character and also enhance the mood. However, character's whole face is still in shadow.

Similar to the pervious shot. This frame from 'The Assassination of Jesse James' also keep the character in a dark silhouette. But unlike the other image, this one used the light from the match to lit up the character's face from a lower angle, which makes the character really creepy and intimidating. Also other thing worth mention is that the pervious image used a strong rim light, but in this one, DP choose to use a kicker light and add a spec hit in character's eye. Both help draw attention to the character but they create different mood and effect. The former one is mysterious, the later one is mysterious and meanwhile intimidating.

This is a frame I choose from 'Ratatouille'. The frame creates a creepy and scary mood by using very hard shadow and high contrast between light and shadow area. You can see there are very distinguish harsh line created by the shadow falling onto the character and the environment.

On the contrary, this frame from animated film 'Puss in Boots' created a really warm and cheerful mood by using a warm color light and lots of indirect illumination. The fill lights coming from the whole environment create a really soft effect the character, making him looks appealing and cute.
Concept Design and 3D Scenes build-up:
Character Design
After deciding to do a lighting study specifically in Character lighting. I started to design my own character. My inspiration of character design partially comes from the little box robot. I saw this very simply robots doing different stuff and in different lighting environment, which create totally different moods and story. This makes me wanna design a 'unlive' character and give him emotion with lighting.


And here is my final character design and 3D model, a wood puppet. Since the focus of this directed study is on Character lighting and lots of my reference will be pulled out from live-action film, I intentionally maintain the facial features of human face in my character (instead of making the head too simply, like a sphere or a cube).


Lighting Progress:
1st Lighting Set-Up: Trying to re-create the lighting in a live-action film I picked


My first practice was pull out a frame from live-action film and try to create the same lighting in a CG environment.
Reference Studies:
The frame I pulled out here is from 'les misérables'. In this frame, the key lights for character is coming from the screen-left and bright value coming from the candles in the background also create a halo and light-wrap around the character, which make the character looks like a little bit back-lit.
Digital Lighting Set-Up Break Down

1st-Step, I added the Key lights from the character.
The 'Key Lights', for me, does not necessary means the lights lit up the character from front. They are the strongest lighting source in the shot, which defines the shape and moods for the character.
In this particular case, they includes the lighting from the screen life, which lit up the side face of character, the rim lights on the other side and an additional lighting for the leaves.

Environment-Key means the main light source in the environment lighting up the whole sets or the brightest part emitting lots of light. it is not necessarily the same key lights for the character. (which is shown in this case). And in this shot, it is the light coming from the light bulb behind the character.

3rd-Step, adding Character Fills and additional Indirect Illuminations (either by using GI, or adding CG lights)

4th-Step, adding Environment Fills and Indirect Illuminations
and the very last step will be compositing. I will show the final image in the last section later.
Lighting Set-Up in Maya:

Usually, there are multiply lights servicing the same function.

And i added additional light just for creating the spec hit on puppet's eyeball.
2nd and 3rd Lighting Set-Up:Creating different mood with lighting in the same scene
After done with the first lighting, I picked other two references from live-action films which have totally different mood, and tried to match the mood with lighting in the same 3D scene.
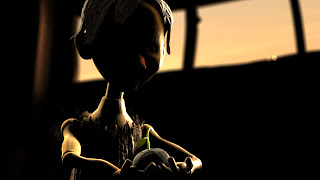
Cold and Mysterious

Reference Studies:
The 1st reference I picked is a frame from 'Blade Runner' with a cold and mysterious mood. This reference have a very heavy atmosphere effect, and really strong rim light on the character in an dark environment, which create a High Lighting Ratio. Another thing worth paying attention is that the Fill light direction. Based on the Spec hit and reflection on characters face we can tell that there is light coming from bottom lighting up the character. This also helps create the mysterious mood.
Digital Lighting Set-Up Break Down

1st-Step, adding Character Key lights

2nd-Step, adding Character Fills

3rd-Step, adding Environment Key.
In this case, the environment key is really just the atmosphere. Although it might not be a typical 'light', but that is a very important part to create the color value for the image and establishing the mood.

4th-Step, adding Indirect Illuminations
Lighting Set-Up in Maya

Soft and Warm:

The 2st reference I picked is a frame from 'Ratatouille' with a really warm mood. Like the cold one, this reference also have a really high lighting ratio, but the light color and overall softness of indirect illumination help create a much soft and warm effect.
1st-Step, adding Character Key Lights and Environment Key Lights

2nd-Step, adding Character Fill Lights
Here, although the key lights are pretty hard and intense like the cold mood, but I used much softer fill lights on the character to create totally different effect. (and also the light color helped a lot)

3rd-Steps, adding Environment Fill lightings

4th-Step, additional Indirect Illumination and Atmosphere
Lighting Set-Up in Maya

Render Result Compare:


No comments:
Post a Comment